Creating a masterpiece might sound like a big task when it comes to preparing a dry rub, but it’s simpler than you think. It’s all about getting the right flavors cozied up to your meat, kind of like chocolate and milk are great paring like Kosher salt and, of course, ground pepper.
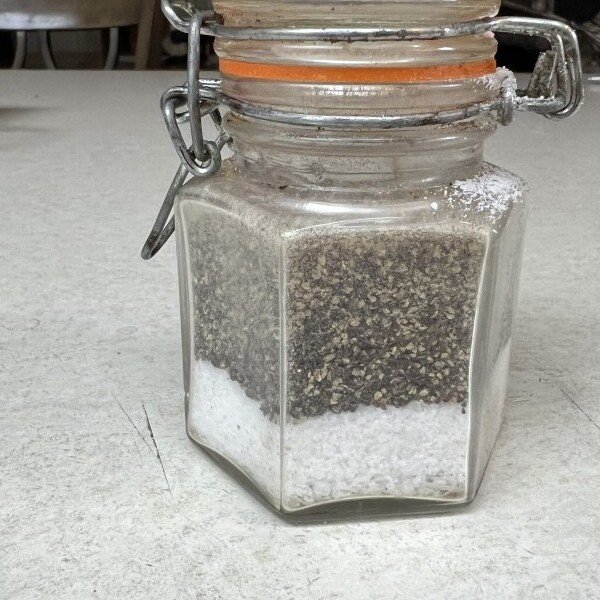
This pic is one-third kosher salt and two-thirds course black pepper in a rubber-sealed glass container, the perfect combo for brisket.

Dry rubs are superstars when it comes to making your meats sing with flavor and texture, and they’re way easier than marinades because they stick around literally.
Back in the day, people began using dry rubs as a way to not only spice up their meat but also to preserve it. So, we’re talking about a technique that’s deeply rooted in culture and tradition, cherished by BBQ fans around the globe. This historical link is pretty cool, making every sprinkle of your rub something kind of special. Whether it is for home use or competition cooking.
Now, why go for a dry rub over other options? Honestly, it’s about that crispy, flavorful crust you get when your meat hits the grill or oven. It’s like magic seasoning dust. Dry rubs stick close-contact to your meat, unlike marinades, giving you fast, tasty results every time. Plus, they’re a flavor powerhouse packed with the same tasty punch, without the mess. Easy to make, easy to transport and easy to apply.
What makes these rubs even better is the range of ingredients you can play with. We’re talking salt, sugar, spices, herbs, and even coffee or cocoa for the adventurous cooks out there. The flexibility means you can tailor your mix to your own taste or what’s on hand in your spice rack. This makes dry rubs perfect for kitchen experiments! With this foundation, you’re setting yourself up to savor some seriously tasty meals.
Building the Perfect Base
Crafting a solid base is the secret sauce to a killer dry rub. Every great rub starts with a balance of salt and sugar—think of them as the dynamic duo that forms the flavorful crust you’re after. The goal here is to set the stage for the rest of your ingredients, kind of like creating the perfect canvas for your flavor art.
Now, let’s talk about the salt and sugar. Kosher salt is a popular choice thanks to its coarse texture which helps in soaking up all that savory goodness. Then we’ve got sugar, which pairs beautifully with salt to add a touch of sweetness and help with caramelization. Brown sugar adds depth with its molasses notes, while white sugar keeps things simple and sweet.
Remember, it’s all about balance. Too much salt can over-season, and too much sugar might burn quickly, especially on the grill. The aim is that sweet spot where both flavors meet and compliment each other. You’re creating a flavor party where everyone’s invited—nothing too overpowering, just a nice, even blend.
Don’t be afraid to tweak the ratios as you go along. Different meats or personal preferences might call for a shift in salt or sweetness. If you’re feeling adventurous, you could even mix in other sugars like demerara for something extra. Always taste your blend before committing it to the meat. You’ve got control over this culinary creation, so make it yours!
Customizing Your Flavor Profile
Here’s where things get really fun. With your base in place, it’s time to play mad scientist with herbs and spices to craft a rub that’s uniquely yours. This is where you can tailor your creation to match your taste buds perfectly, letting your flavor imagination run wild.
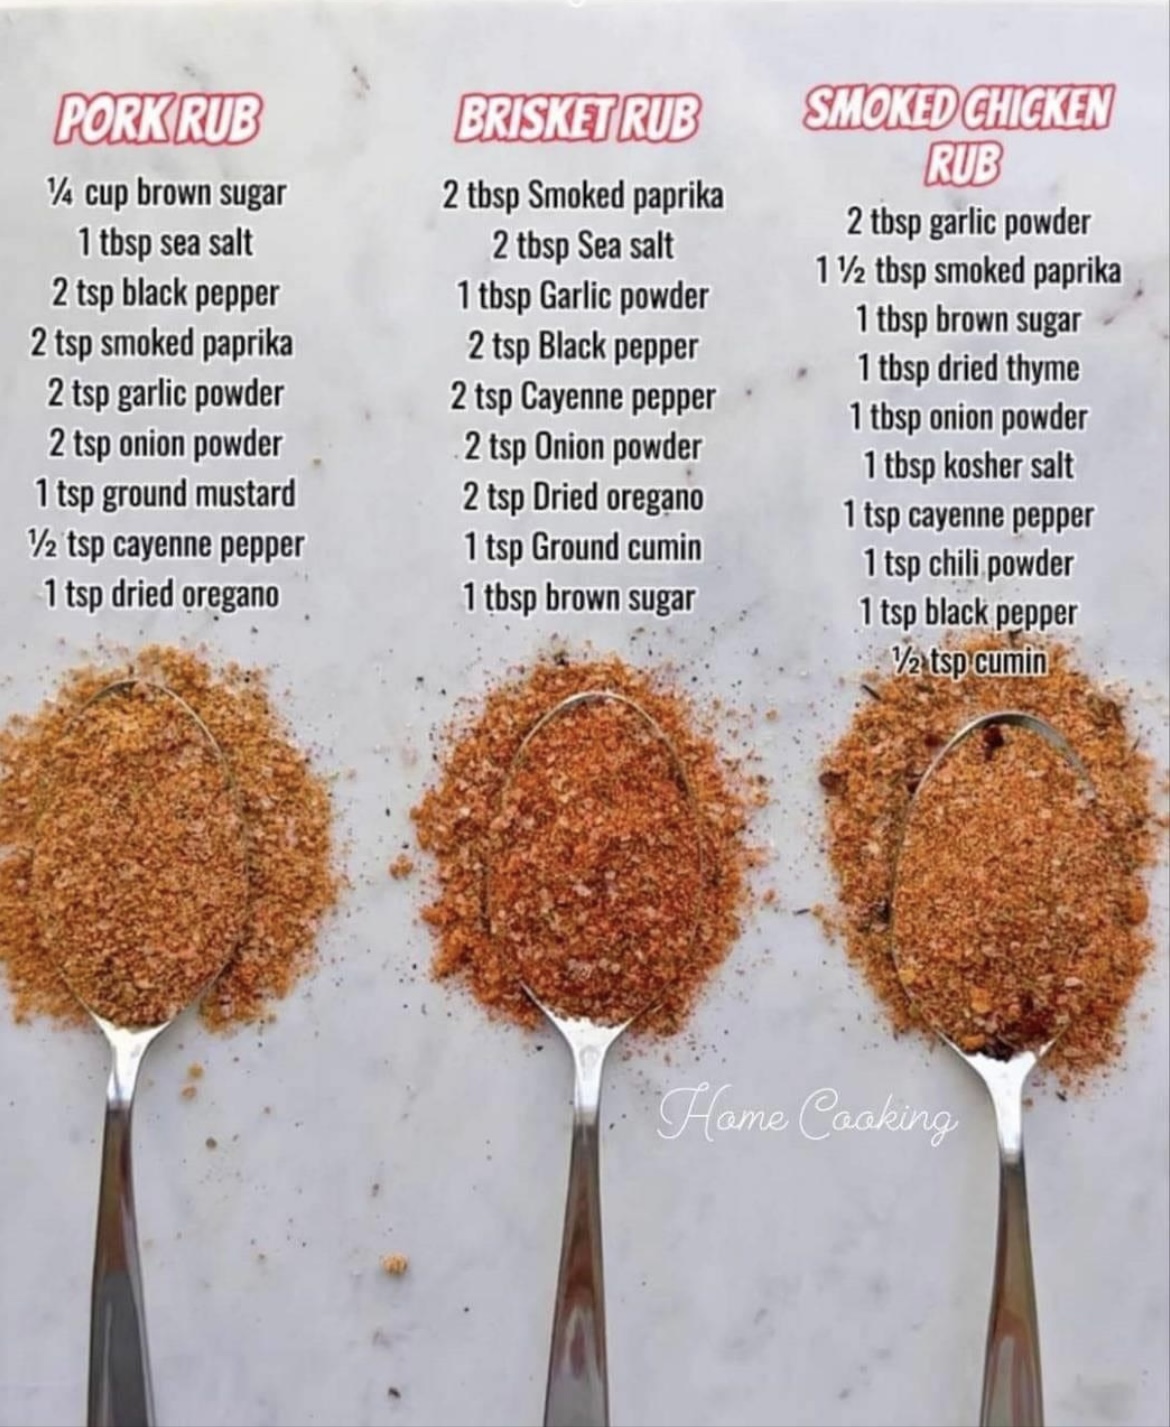
Paprika is a staple in many rubs, lending a rich color and smoky undertone. Garlic and onion powder are like the twins you never knew you needed, adding a savory punch with just the right hint of warmth. And hey, don’t forget about the black pepper for that classic bite.
For those who like a little kick, add some cayenne or chili powder—just a pinch so it doesn’t overpower. If you’re into earthy or herbal notes, thyme and cumin are your go-tos. The key is mixing and matching until you find what hits the spot. Don’t be afraid to test out new combinations; that’s how flavor legends are made!

Now, about freshness. Spices tend to lose their punch over time, so whenever you can, go fresh. Grinding your peppercorns or cumin seeds can make a noticeable difference, giving your rub that extra zing that pre-ground spices sometimes lack.
Remember, adjust based on what you’re cooking. Pork often loves the sweetness paired with savory notes, while beef might sing with stronger, deeper flavors. The end goal is a harmonious blend that enhances and complements the meat, making every bite a flavorful explosion.
Techniques to Enhance Rubs
Once you’ve got your flavor-packed rub ready, it’s all about the right technique to bring those ingredients to life. Achieving the perfect balance between sweet, salty, and spicy is key to ensuring your rub delivers on taste without any particular note overshadowing the others. Play around with your sugary elements for sweetness, adjust the salt for seasoning, and add hints of heat using chili powders or cayenne.
Another layer of depth can come from incorporating aromatics like onion and garlic powders or dried herbs like oregano and thyme. These elements are like secret weapons, subtly boosting the complexity of your mix with their layered flavors, giving each bite a story to tell.
For those looking for something a bit more adventurous, there are unique ingredients to explore. Imagine the boldness of coffee or the rich twist of cocoa powder. Even citrus zest can add a refreshing, tangy punch to the mixture, waking up the senses with each taste.
Once your dry rub is all mixed and ready, applying it to the meat the right way matters. Generously coat your chosen protein, making sure it’s evenly covered. Then, it’s all about patience. Let the meat sit with the rub for at least 30 minutes, allowing it to absorb all those delicious flavors. For deeper penetration, pop it in the fridge for a few hours or even overnight.
While it might be tempting to pile it on, remember—less is often more. A thick, even layer is your goal, providing a good crust without overshadowing the meat’s natural flavor. Treat your rub like a dance partner; working in harmony without stepping on each other’s toes is what you want.
Preserving and Storing Your Dry Rub
After all the spice-blending excitement, ensuring your carefully crafted dry rub is stored properly is key to maintaining its bold flavors. It’s a bit like looking after a fine wine; the right conditions can keep it perfect for when you’re ready to use it again.
Start by packing your leftover rub into an airtight container. This keeps moisture and air out, both of which can dull that freshly-made sparkle. A mason jar or a well-sealed baggie can do the trick, keeping those flavors locked in tight.
Find a cool, dark place for storage—away from direct sunlight or heat sources. Heat and light can mess with the potency of your spices, making them less flavorful over time. The back of a cupboard or pantry can be ideal, I keep mine in the freezer. Saving that zesty kick for your next culinary adventure. Your freezer is the best place.
While rubs can last for several months, aiming to use them within 3-6 months is the sweet spot for flavor freshness. After all, you’re after those bright, bold tastes, not something muted and flat.
And when you’re ready to coat that next piece of meat, give it a little sniff or taste test to ensure it’s still packing the punch you expect. If it’s lost a bit of its oomph, consider freshening it up with a sprinkle of newly ground spices or a dash of herbs to revive its original vibe.
There you go—an epic guide through the world of dry rubs! From balancing flavors to mastering storage, you’re now equipped to take your culinary creations to the next level.
Please leave a comment below if you have any questions
Thanks
Rolland
@dallicious.com

